
Telegram is gradually turning into a whole commercial structure, ceasing to be just a multifunctional messenger. The paid Premium subscription and a separate platform for buying and selling valuable nicknames Fragment are now joined by one-time donations for authors who want to distribute exclusive content for an additional fee. A special invoice is issued through a verified @donate bot – the reader will have access to the content of the publication only after transferring the designated amount of money.
Currently, the innovation is in the testing stage, but it can already be tried by all interested owners of public channels. In this article, I tell you in detail how to connect a bot to your channel, register and start selling photos on Telegram.
Connect the @donate bot to the channel
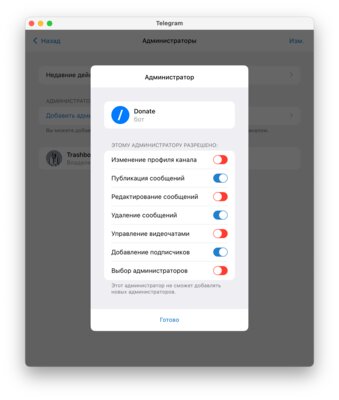
- Add a bot to your channel – to do this, go to the channel profile, open the “Administrators” section and click “Add administrator” (in the search, enter @donate). Or go to the profile of the bot itself and click “Add to group or channel” at the bottom.
- Give the bot the following rights: “send messages”, “delete other people’s messages” and “add subscribers”.
- Go to the chat with the bot and start it by clicking the “Start” button.
- Send the /register command.
- In the window that opens, enter your registration data.
💡 Note: Your channel must have more than 100 subscribers to successfully connect the @donate bot. The registration form includes the country of residence, bank card details (if desired, you can add the payment method with TON coins) and the mode of notifications from the bot about the statistics of receiving funds from users (daily, in real time, or without them at all).
Important: what is required to connect
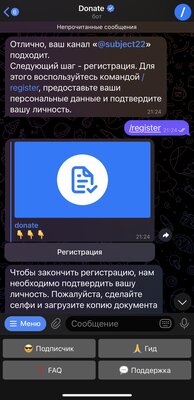

To continue registration, you must accept the rules of the service. From the next step, identity verification begins, for which you will also need to consent to the processing of personal data. You will be asked to scan your face by taking a selfie, indicate your country of citizenship and send a photo of an identity document (this can be a passport, ID card or driver’s license).
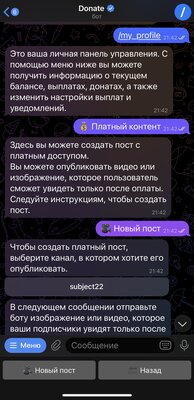
After going through all the procedures, wait for the verification check from the bot for some time. The service will send you a message as soon as it checks the information and confirms the registration process. If everything is fine, then you will be able to receive donations. The control panel inside the @donate bot works with the /my_profile command – the “Paid Content” option allows you to schedule the publication of photos and videos that subscribers will be able to see after payment.
Source: Trash Box
Johanna Foster is an expert opinion writer with over 7 years of experience. She has a reputation for delivering insightful and thought-provoking articles on a variety of subjects. Her work can be found on some of the top online news websites, and she is currently lending her voice to the world stock market.


