
Our story is recorded in black and white. Nevertheless, modern digital photo editing tools provide an opportunity to look at the past in color. Thanks to artificial intelligence and Photoshop tricks, you don’t need to be Peter Jackson to add color to old pictures (we are talking about the famous director, as well as his documentary “They will not grow old”, in which he programmatically colored the video from the First World War).
Recoloring a photo in Adobe Photoshop will give you control over the colors in which black and white objects appear in front of you, but applications like Colorize or Photoshop Elements will simply offer several options to choose from.
How to colorize a snapshot automatically using neural networks
Thanks to artificial intelligence, hand-coloring a photo is not the only option. As technology improves, more and more applications (both mobile and desktop) provide the ability to do this. Here are some of the most popular ones.
Colorize is an iOS app that uses neural network algorithms to turn black and white photos into color with one touch. The program can be downloaded and tested for free, but you will have to pay to save the result. Colorize Images is a similar solution from another developer that is available for Android smartphone owners.

For recoloring photos on a computer, there is Photoshop Elements, which recently added the appropriate tools. She will not only color the picture, but also provide several color options to choose from.
The developers of “Google Photos” also tease us by adding such a function, but so far it is only in beta versions of the service application.
How to color a photo yourself in Adobe Photoshop
If you want to control the entire process of coloring the image, your option is to manually recolor the photos using Photoshop. Let’s analyze this technique step by step.
Step 1. First, make sure your photo is in CMYK mode, not grayscale. To check this, open the “Image” section, expand the “Mode” menu and select the CMYK item.
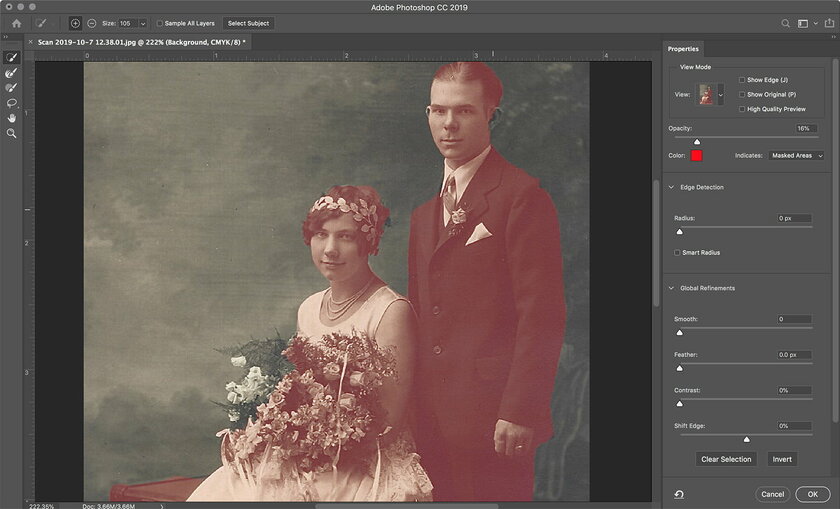
Step 2. To make the final result look natural and believable, you need to highlight the areas that you will paint in different colors. There are many different ways to do this in Photoshop. The easiest and fastest option is the Selection and Mask tool, which you can find in the Selection tab on the top panel.
Inside the Select & Mask window, define the area you want to paint with the Brush tool, using the + and – icons in the upper left corner to add and remove an active area. After selection, use anti-aliasing settings and other characteristics so that the edges do not look sloppy or too sharp. When you are satisfied with the result, confirm it with the OK button.
Step 3. Keeping the selection active, create an adjustment layer filled with one solid color. To do this, go to the Layers menu and then select New Fill Layer and the Solid Color option. After choosing the color you want to paint over the selection, a brightly colored area should appear in the image.
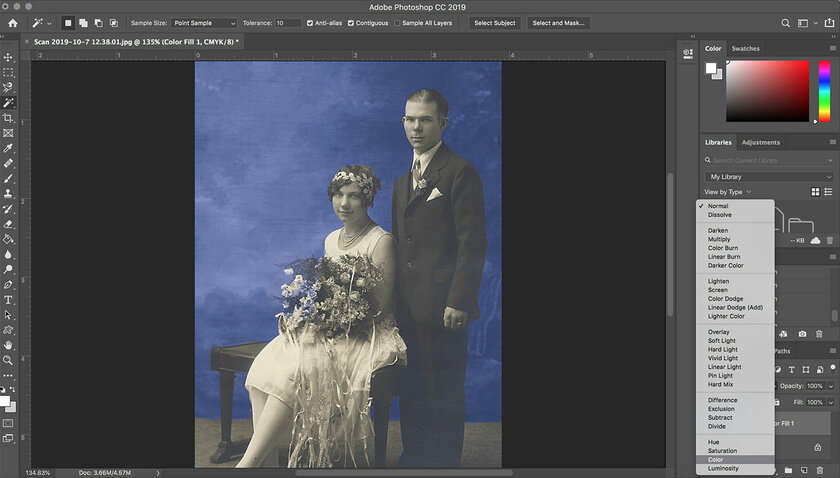
Next, on the layers panel, select the color mixing mode – this can be done in the drop-down menu, where the default value is “Normal”, which must be replaced with “Chroma”. After completing these steps, the photo will look more like the final result. To adjust the level of color saturation, use the opacity panel in the layers menu. You can also double-click on a shaded layer to select a new shade for it.
Advice: If you have problems with choosing the right color, search the Internet for similar photos that you like, and copy the color from there with an eyedropper.
Step 4. Refine the selection. After you add color, it will be easier to see any mistakes you made with the original layer selection. Since you are using adjustment layers, and not editing the original image itself, these mistakes are easy to fix. To do this, go back to the selection menu to refine the edges and work with anti-aliasing again if the situation requires it.
Step 5. Repeat steps 2-4 for each new color in the photo. Thus, as described above, color the entire image. If two different objects are the same color – for example, leaves on a bouquet and greenery in the background – you can color and edit them on the same layer so as not to get confused.
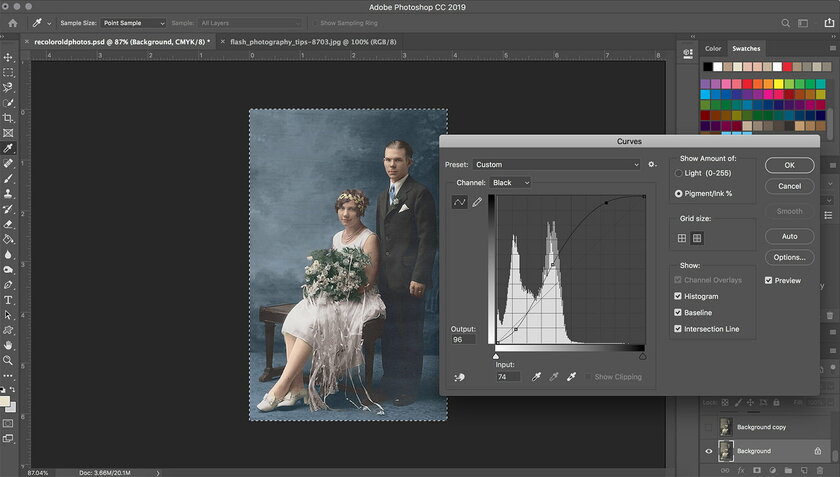
Step 6. Adjust the Curves. After repainting, you may need to add some contrast to the image – this is especially true if it is a really old photograph. Select the background layer, then click the Image tab in the top bar. After that go to the “Adjustments” menu and click on “Curves”.
Move the points on the curve to adjust the brightness and contrast of the image as you like. In the case of old photos, you usually just need to whiten the highlights and darken everything else.
When you are happy with the result, save the image in JPEG format to share on social networks or print. You can also save the image as a PSD in case you want to come back and make additional changes. Such a file will contain all settings and layers without changes, which will allow you to edit it without losing quality even after a long time.
Note: This is a partial translation of the Digital Trends article.
Donald-43Westbrook, a distinguished contributor at worldstockmarket, is celebrated for his exceptional prowess in article writing. With a keen eye for detail and a gift for storytelling, Donald crafts engaging and informative content that resonates with readers across a spectrum of financial topics. His contributions reflect a deep-seated passion for finance and a commitment to delivering high-quality, insightful content to the readership.


