
The modern Internet is built in such a way that each site that works with user data must have a TLS certificate – a digital signature of the site, confirming its authenticity. If this certificate is revoked, no browser will allow the user to visit the site – this is done for security reasons.
At the end of September, Sber transferred its main website to a Russian certificate issued by the National Certification Center of the Ministry of Digital Development. In the future, all Sber services will switch to such — it is likely that other backbone organizations will do the same. In order for them to open for you, you need to install Russian certificates on your devices.
What you need to know before installation
- You will need a certificate on all devices from which you plan to access domestic sites that require it. They will have to be installed on a smartphone, computer and / or tablet separately.
- To access Russian services through an application, not a website, a certificate is not needed – the Gosuslug application, the SberBank Online mobile client and other programs will continue to work.
- The official website of Gosuslug has a list of portals that have been issued a domestic certificate – access without a Russian digital signature will be limited only to them.
The easiest way is to use a Russian browser
Now the necessary certificates are supported only by Russian web browsers – Yandex Browser and Atom from VK (Mail.Ru). Details about the operation of the application from VKontakte are unknown, but Yandex.Browser revealed its algorithms. It uses certificates not for the entire Runet, but only for those domains to which these digital signatures were issued – if you apply certificates on all sites at once, portals would simply not open without them.
However, if you do not want to use a domestic browser on all your devices, Russian certificates can also be built into the operating system itself. In this case, you can use any web browser, be it Chrome, Opera, Safari or any other.
Installation on Android (Xiaomi and others)
- Open “Gosuslugi” and go to the page “Support for sites with Russian certificates”.
- Go to the Android Certificates section and download the root.
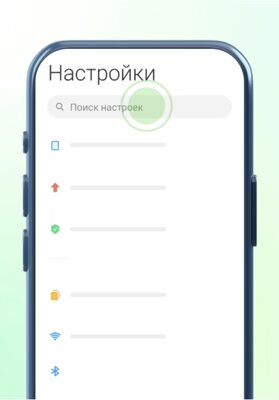
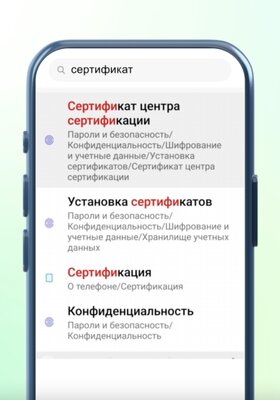
- After the download is complete, go to the “Settings” of the smartphone, and then enter “Certificate” in the search box (if this search field is not there, drag the settings items down).
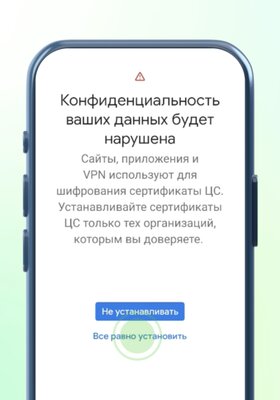
- Select “Certificate Authority Certificate” (the name of the item may differ depending on the firmware). If you see a warning about a possible privacy risk, skip it – click “Install Anyway” and enter the passcode from the smartphone (which is used when unlocking).
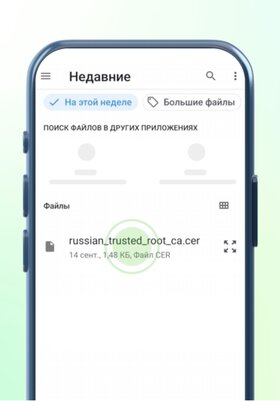
- In the file manager that opens, in the Downloads or Downloads folder (or in the Recent section), select Russian Trusted Root CA – the file name can be russian_trusted_root_ca.cer. If the certificate is successfully installed, a corresponding inscription will appear on the screen.
- Return to the Gosuslug website and install the second certificate in the same way – the issuer. At the stage of choosing a certificate, you will need to select the Russian Trusted Sub CA, that is, another file – russian_trusted_sub_ca.cer.

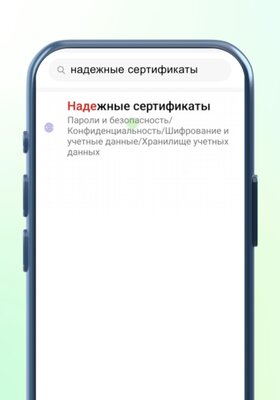
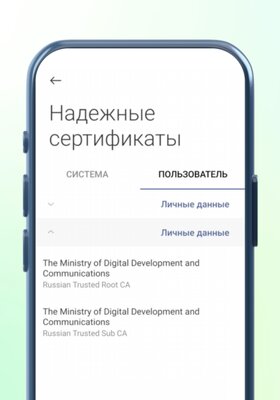
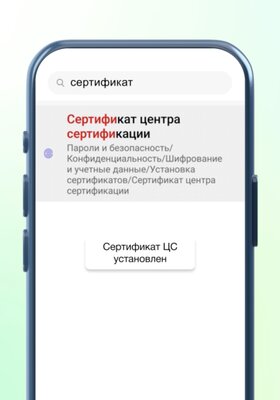
To check whether the certificates were successfully installed, you need to return to the “Settings” of the smartphone and enter “Trusted Certificates” (or “Trusted Credentials”) in the search field and open the found item. In it, in the “User” category, there should be two certificates: Russian Trusted Root CA and Russian Trusted Sub CA.
Installation on Samsung smartphones and tablets
Samsung gadgets use proprietary firmware, in which the procedure for installing certificates is slightly different.
- Open “Gosuslugi” and go to the page “Support for sites with Russian certificates”.
- Go to the Android Certificates section and download the root.
The following error may appear (this is normal, skip it by pressing the OK button):
- Go to the “Settings” of the smartphone, and then in the search box, enter “Certificate” (if this search field is not there, drag the settings items down).
- Select the “CA Certificate” item, and then it again in the new menu. If you get a warning about a possible privacy risk, skip it – click “Install anyway” and enter the passcode from your smartphone (which is used when unlocking).
- In the file manager that opens, in the Downloads or Downloads folder (or the Recent section), select Russian Trusted Root CA – the file name can be russian_trusted_root_ca.cer. If the certificate is successfully installed, a corresponding inscription will appear on the screen.
- Return to the Gosuslug website and install the second certificate in the same way – the issuer. At the stage of choosing a certificate, you will need to select the Russian Trusted Sub CA, that is, another file – russian_trusted_sub_ca.cer.
Unable to install CA certificates
This certificate from the null app needs to be set in the Settings menu. Install certificates only from trusted CAs.
To check whether the certificates were successfully installed, you need to return to the “Settings” of the smartphone and enter “Security Certificates” (or “Trusted Certificates” or “Trusted Credentials”) in the search field and open the found item. In it, in the “Security Certificates” category in the “User” tab, there should be two certificates: Russian Trusted Root CA and Russian Trusted Sub CA.
Installation on iOS (iPhone and iPad)
- Open “Public Services” and go to the “Support for sites with Russian certificates” section.
- Go to the certificates for iOS section and click on the “Download profile” button. After that, the notification “The website is trying to load a configuration profile. Allow?” – allow. After that, a notification should appear that the profile has been loaded.
- Go to your device’s Settings and select “Profile Uploaded” (under your iCloud name) that appears. The profile installation window will open – click “Install” in the upper right corner and enter the passcode (which is used when unlocking).
- A warning window will appear – click “Install” again in the upper right corner, and then the same button at the bottom. A menu should appear with the table of contents “Profile installed” – click on “Finish” in the upper right.
- Now you need to enable certificate trust. Go back to your device’s Settings and go to General ➝ About this device ➝ Certificate Trust (at the very bottom). Enable trust for the Russian Trusted Root CA certificate by moving the switch to the right of it (the slider should turn green). In the window that appears, click “Next”.
Installation on Windows
- Open “Public Services” and go to the “Support for sites with Russian certificates” section.
- Go to the certificates for Windows section and download the first one – root.
- Run the downloaded file russian_trusted_root_ca.certhen click Open, followed by Install Certificate.
- The “Certificate Import Wizard” will open. Select “Current User” and click “Next”.
- Check the “Place all certificates in the following store” box, click on the “Browse” button and click on the “Trusted Root Certification Authorities” folder. Then click on “OK” and “Next”. In the new completion window, click Finish. If a security warning opens, click Yes.
- Return to the Gosuslug website and install the second certificate in the same way – the issuer. The only catch is in the menu for importing certificates, select “Automatically select storage based on certificate type”.
Installation on macOS (Mac, MacBook)
- Open “Public Services” and go to the “Support for sites with Russian certificates” section.
- Go to the certificates for Windows section and download the first one – root.
- Run the downloaded file EnglishTrustedCA.pem. The Keychain Access application will open, enter the username and password for the current profile on the computer, and then click on Change Keychain.
- In the “Keychain Access” on the “Certificates” tab in the “Login” item (on the left), find the Russian Trusted Root CA and Russian Trusted Sub CA – select the first one. Expand the “Trust” tab (under the certificate icon on the left) and set the “Always trust” value in the “Certificate usage options” item. Enter your username and password, and then click on Update Settings.
- Repeat the same steps from the fourth paragraph, but for the second certificate – Russian Trusted Sub CA.
Source: Trash Box
Johanna Foster is an expert opinion writer with over 7 years of experience. She has a reputation for delivering insightful and thought-provoking articles on a variety of subjects. Her work can be found on some of the top online news websites, and she is currently lending her voice to the world stock market.


 on the water: her floating festival in Trieste is pure magic")


